Setup Guide
Welcome to the setup guide for Dea7hSmiles Launchbox\Bigbox Automated Lightgun Build. This guide will help walk you through the setup process and answer some common questions you may have
It is recommended to use a drive of at least 2TB to allow for future updates. This can be an internal or external drive. Using a SSD will give better performance but is not required
Download and Installation
Step 1 - Setup your drive
Connect a drive to your computer. It is recommended to use a empty drive but not required. The drive can have any drive letter (A:/, F:/, Z:/ for example) as this build mostly uses relative paths
Once connected, you need to exclude this drive from your antivirus software. Some files included in the build can cause false positives, which means they are deleted
- If using Windows built in antivirus, you can exclude the drive by clicking the Search Bar and typing Virus & threat protection
- In the window that opens click Manage Settings under the header Virus & Threat protection settings
- Scroll down until you see Exclusions. Click Add or remove exclusions
- Click Add an exclusion -> Folder. Select the drive you will use for the build and click Select Folder
If using an alternative anti-virus software, it is recommended to Google the instructions if you are not sure how
Step 2 - Download the base package
Download the full base package from Arcade Punks or the Dea7hSmiles website.
Once downloaded, extract (using 7Zip) the software to the root of your drive. Do not add additional folders (such as "Light Gun Build")
- Right click on the Dea7hsmiles Launchbox Build.rar file
- In the menu that opens click 7-Zip -> Extract Files... (if using Windows 11, you first will have to click Show More Options at the bottom)
- In the Extract to field, select your drive. Do not add additional folders\paths here. The final result should look similar to below:

Wait for the extraction to finish. This can take many hours due to the size and speed of your devices.
If you accidentally add an extra folder, no worries. You can cut and paste the contents to the root of a drive. Do this before running the setup later on though!
Step 3 - Download the All in One Update
Download the newest All in one Update from Dea7hSmiles website.
Once downloaded, extract (using 7Zip) the update to the root of your drive, overwriting any files it asks.
- Right click the Dea7hsmiles-Launchbox-All-In-One-Update(Recommended).zip file
- In the menu that opens click 7-Zip -> Extract Files... (if using Windows 11, you first will have to click Show More Options at the bottom)
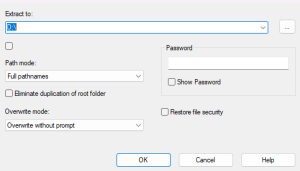
- In the Extract to field, select your drive. Do not add additional folders\paths here. Also select Overwrite without prompt in the Overwrite Mode. See Below:

Wait for the extraction to finish. This can take many hours due to the size and speed of your devices
Step 4 - Setup
Run the setup.exe. This installs software such as DirectX and AutoHotKey that are required to make the build function.
- Navigate to the drive where the software has been extracted
- Click the Setup.exe file
- Sinden Users Only - run the setup.exe located in the Sinden Gun Users Only folder
- Follow along with the prompts that appear

Step 5 - Set your COM ports
Set the correct COM ports for your Light Guns.
- Right click the Windows Start button on your taskbar and select Device Manager
- In the window that opens select Ports (COM & LPT)
- Right click on your light gun and select Properties
- In the window that opens, click Port Settings then Advanced
- In the window that opens, change the COM Port in use to the one identified in the chart below:
COM Port Assignment List
OpenFire
Gun 1 → COM1
Gun 2 → COM2

Blancom
Gun 1 → COM1
Gun 2 → COM2

Gun4IR
Gun 1 → COM1
Gun 2 → COM2

XGunner
Gun 1 → COM1
Gun 2 → COM2

MX24
Gun 1 & 2 → COM5 (Hub)

RS3 Reaper - Turn off recoil switch (set slider to the middle)
Hub → COM5
Gun 1 → COM6
Gun 2 → COM7
Gun 3 → COM8
Gun 4 → COM9
If you have trouble finding what your player 1 and player 2 gun is under the Ports (Com & LPT) section, unplug the guns and plug them in one by one. The devices will disappear when unplugged and reappear when plugged back in
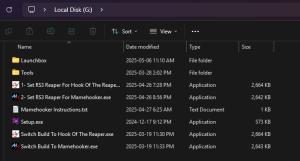
Step 6 - Setup HookoftheReaper or MameHooker
Hook Of The Reaper/Mame Hooker are similar pieces of software that allow your Light Guns to respond to the game. This includes features such as rumble when taking damage, slide recoil when pulling the trigger, etc.
Hook Of The Reaper is a newer implementation of these features and is continuing to get updates and support. While you can use either piece of software, it is recommended to use Hook Of The Reaper for future compatibility
- Navigate to the drive where the software has been extracted
- Depending on the type of Light Gun, Click either 1- Set XXXXX For Hook Of The Reaper.exe or 2- Set XXXXX For Mamehooker.exe depending on what software you wish to use
- Wait for a prompt to appear that says "Hook of the Reaper successfully set for XXXXX" or similar for Mamehooker
If you want to switch the build to try the alternative software, you can run either Switch Build To Hook Of The Reaper.exe or Switch build to Mame Hooker.exe
Using the Software
This build uses software called LaunchBox to help with the automation and keep everything in one neatly organized interface. The base version of LaunchBox is free to use.
BigBox is a licensed piece of software from LaunchBox that provides a more sleek interface better suited to navigation with a controller. To use BigBox, you will be required to purchase a license from LaunchBox
LaunchBox
LaunchBox can be run by navigating to the Launchbox folder and selecting LaunchBox.exe

BigBox
BigBox can be run by navigating to the Launchbox folder and selecting BigBoxLightGunControl.exe. This is a customized version that better maps navigation to a light gun

Updating the Software
Dea7hSmiles releases updates for this build from time to time. There are 2 types of updates, the All in One Update and the much smaller Individual Updates
If you do not know what version of the build you are running, download the All in One Update! This update includes all updates released since the original build was released!
If you know what update you last installed, you can download any subsequent smaller Individual Updates. You must download and install these updates in the order they were released
All In one Update
Download the newest All in one Update from Dea7hSmiles website.
Once downloaded, extract (using 7Zip) the update to the root of your drive, overwriting any files it asks.
- Right click the Dea7hsmiles-Launchbox-All-In-One-Update(Recommended).zip file
- In the menu that opens click 7-Zip -> Extract Files... (if using Windows 11, you first will have to click Show More Options at the bottom)
- In the Extract to field, select your drive. Do not add additional folders\paths here. Also select Overwrite without prompt in the Overwrite Mode.
Individual Updates
Download the Individual Update(s) from Dea7hSmiles website. Keep in mind you need to download and install the updates in the order they were released
For example, if I am on the 5/7/2025 Update, I need to download and install the 5/16/2025 Update, then download and install the 8/2/2025 Update Once downloaded, extract (using 7Zip) the update to the root of your drive, overwriting any files it asks.
- Right click the Dea7hsmiles-Launchbox-Build-Update-(Recommended).zip file
- In the menu that opens click 7-Zip -> Extract Files... (if using Windows 11, you first will have to click Show More Options at the bottom)
- In the Extract to field, select your drive. Do not add additional folders\paths here. Also select Overwrite without prompt in the Overwrite Mode.
Built In Updater
The built in updater only downloads the latest All In One Update. It does not install this update. Follow the instructions for the All In One Update above to extract the update