RS3 Reaper: Difference between revisions
Jump to navigation
Jump to search
InfoBox |
mNo edit summary |
||
| (20 intermediate revisions by the same user not shown) | |||
| Line 1: | Line 1: | ||
{{LightGunInfoBox | {{LightGunInfoBox | ||
|logo=RetroShooterLogo. | |logo=RetroShooterLogo.png | ||
|Website=https://retroshooter.com/ | |Website=https://retroshooter.com/ | ||
| | |Compatibility=Mame Hooker,Hook Of The Reaper | ||
|Features=Rumble,Slide Recoil,LED,Firing Modes | |Features=Rumble,Slide Recoil,LED,Firing Modes | ||
}} | |title=RS3 Reaper}}The flagship Lightguns of Retro Shooter | ||
{| | |||
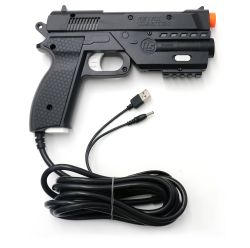
![[File:RS3-Reaper.jpg|left|thumb|250x250px]] | |||
!{{LightGunFeaturesTemplate|Technology=LED|Direct Input={{checkbox|status=y}}|Rumble={{checkbox|status=y}}|Slide Recoil={{checkbox|status=y}}|LED={{checkbox|status=y}}}} | |||
| | |||
{| | |||
! Firing Modes | |||
|- | |||
!Single Shot | |||
|{{checkbox|status=y}} | |||
|- | |||
!Semi Auto | |||
|{{checkbox|status=n}} | |||
|- | |||
!Full Auto | |||
|{{checkbox|status=y}} | |||
|} | |||
| | |||
{| | |||
! Content Modes | |||
|- | |||
!4x3 | |||
|{{checkbox|status=y}} | |||
|- | |||
!16x9 | |||
|{{checkbox|status=y}} | |||
|- | |||
|} | |||
| | |||
{| | |||
! Output Support | |||
|- | |||
!Mame Hooker | |||
|{{checkbox|status=y}} | |||
|- | |||
!Hook of the Reaper | |||
|{{checkbox|status=y}} | |||
|- | |||
|} | |||
|} | |||
=== Setup === | |||
Gun is fully supported by the Automation process. No additional Setup required | |||
=== Manual === | |||
Manual available here:[[File:Retro-Shooter-Lightgun-User-Manual-2025-1.pdf]] | |||
=== Troubleshooting === | |||
==== Reapers Swapped Player 1 and Player 2 Issue ==== | |||
'''Problem:''' Player 1 and Player 2 are swapped when using Reapers | |||
'''Cause:''' Due to the way Windows enumerates devices (how it loads them), Windows can cause the devices to be loaded in the wrong order and the automation software gets confused | |||
'''Solution:''' | |||
# Ensure your build is fully up to date. | |||
# Navigate to <code>\Tools\Misc</code> and open the '''UsbDeview''' folder. Inside, launch the program. Locate your Reapers, right-click and select '''Uninstall'''. | |||
# Disconnect the light guns from the HUB | |||
# Reboot your PC | |||
# When booted, plug in the Player 1 gun. In device viewer, validate that the light gun is set to COM6. If not, set it to COM6 (if COM6 shows as in use, set it and click ok to the message to continue) | |||
# Plug in the Player 2 gun. In device viewer, validate that the light gun is set to COM7. If not, set it to COM7 (if COM7 shows as in use, set it and click ok to the message to continue) | |||
Latest revision as of 22:50, 1 October 2025
 |
|
| RS3 Reaper | |
|---|---|
| Website | https://retroshooter.com/ |
The flagship Lightguns of Retro Shooter
 |
|
|
|
|
|---|
Setup
Gun is fully supported by the Automation process. No additional Setup required
Manual
Manual available here:File:Retro-Shooter-Lightgun-User-Manual-2025-1.pdf
Troubleshooting
Reapers Swapped Player 1 and Player 2 Issue
Problem: Player 1 and Player 2 are swapped when using Reapers
Cause: Due to the way Windows enumerates devices (how it loads them), Windows can cause the devices to be loaded in the wrong order and the automation software gets confused
Solution:
- Ensure your build is fully up to date.
- Navigate to
\Tools\Miscand open the UsbDeview folder. Inside, launch the program. Locate your Reapers, right-click and select Uninstall. - Disconnect the light guns from the HUB
- Reboot your PC
- When booted, plug in the Player 1 gun. In device viewer, validate that the light gun is set to COM6. If not, set it to COM6 (if COM6 shows as in use, set it and click ok to the message to continue)
- Plug in the Player 2 gun. In device viewer, validate that the light gun is set to COM7. If not, set it to COM7 (if COM7 shows as in use, set it and click ok to the message to continue)